In my first DIY Garden of Sunflowers, I opted to try a seed starter kit. That was the greatest learning experience as you get a lot of satisfaction as you watch the little seedlings emerge.
Here are the actual sunflower seedlings that I grew.
I actually used three different packages of Burpee Sunflower Seeds for my first kit. You don't need to get that elaborate with your first project. Start with one type of seed.
The amount of time spent with this project is minimal, with so much reward at the back end! Are you ready to get started?
Time required: One Week to Ten Days
Difficulty: easy
Cost: Less than Twenty Dollars!!
Materials:
- Burpee Deluxe Eco-Friendly 25 Cell Seed Starting Greenhouse Kit
- Burpee 47902 Sunflower Autumn Beauty Mix Seed Packet
- Water
Step-by-Step Instructions:
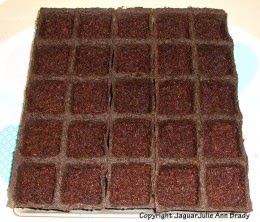
- Start with your own Burpee Seed Starting Kit.
This is the 25 cell greenhouse kit that I used. The instructions are self-explanatory. Even blondes can handle this!
- Once your growing mixture has filled the each cell of your seed starting kit, the tough part is to decide which seeds you will plant.
In each of the cells I actually planted two seeds! Using my index finger as a tool, I push the little seeds into the center of the cells. I also opted to use two columns of like seeds from the first and second packets with the middle column from the third packet.
- After watering each of the cells, you cover with the plastic film supplied in your kit.
I placed it on a waterproof place mat on my kitchen table.
- Each morning, you will want to lift the film to check on your progress.
Here is the first view of the little seedlings emerging. Be sure to add a little water to keep each cell moist.
- Next morning, more of the little seedlings are emerging in the cells.
I fill a glass with tepid water and use a tablespoon to spoon the water over each cell; recovering with the plastic film.
- Before you know it, the little seedlings are growing!
Each day, a little more growth!
- Another day later and it looks as though each cell has something going on!
You are still keeping each cell moist and covering with the plastic film.
- At this point of growth, you are no longer using the plastic film to cover the cells.
I opted to replant these in a rectangular container inside for about one more week of growth before transplanting outside in the flower garden.
Move It, Move It, Move It!!
Just a little injection of fun because this should be fun after all. Move your little seedlings to a larger pot before taking them out into the cold cruel world to fend for themselves!! You dig?
I am fortunate to have a finished Florida Room that gets a lots of sunshine. I took the greenhouse kit and broke apart each of the twenty-five cells. I filled the rectangular pot about half way with Miracle-Gro Potting Mix. Then, I spaced out each of the cells with the tiny seedlings. I covered them with the potting mix, watered, and put on the floor in a sunny corner. Each day, I checked to see that the soil was moist. Soon, it would be time to take the plunge ... OUTSIDE!
Time to Dig; You Dig!
If this is your first DIY garden, you will need to dig out a space that works. Think lots of sunlight. Another good place would be along a fence so that the tall plants will have something to lean on! Lean on me when you're not strong!
History: Excerpt from DIY Garden of Sunflowers that was originally created on Squidoo by JaguarJulie on May 2, 2014. On May 3, 2014 this lens earned the Purple Star Award for quality content. This lens was honored as lens of the day on May 14, 2014.


